India has been one of the active proponents in establishing solar energy as the major source of electricity. Using environmentally friendly materials is one of the most considerate things industries can do to ensure sustainability of the environment. Many people have turned to solar energy to power all of their manufacturing and other activities through companies like Thermax Global and their expertise in solar PV installation.
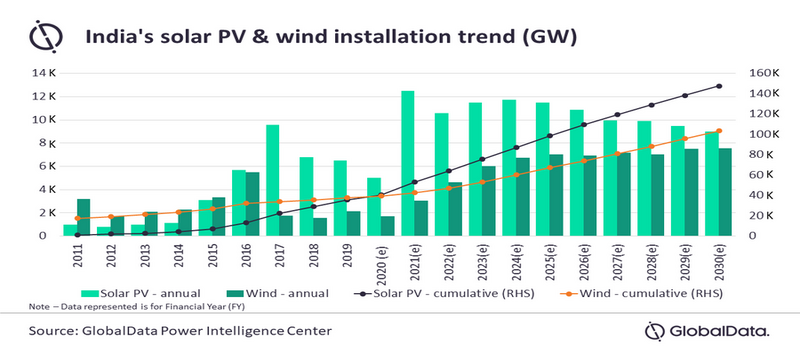
Solar energy is currently used in a variety of critical activities ranging from air cooling to electric power to machine fuelling through solar panels. By 2030, the country hopes to have installed renewable energy capacity of around 450 gigawatts (GW), with solar accounting for roughly 280 GW (almost 60%). Below is a graph that talks about the growing demand for solar energy.

Now, if you are working on solar PV installation, you will need a guide that will provide you with all the necessary dos and don’ts. So, here is what you need to know about solar PV installation in India:
Pre-installation Checks – All the Things to Take Care of Before Starting
Since installing solar panels will require you to be focussed, it is better to go through everything before starting. Below is a basic concept of solar PV and its working:

- Purchase supplies not included in your shipment
Ensure that you have wiring, toolbox, junction boxes, splicing devices and anything else you might need to install without hiccups.
- Inspect your package to verify there are no missing or damaged items
Check all the items in the package and system thoroughly before starting. Any damage or missing parts will halt your solar PV installation.
- Keep your system and yourself organised while unpacking everything
Ensure that everything is well organised before starting the installation. This will reduce confusion down the line and ensure smooth operation.
- Examine and understand safety precautions before installing your system
Always check for safety ratings on all of your equipment and electrical systems. This will prevent any accidents. India has different ratings so ensure that you have the right ratings for solar PV installation in India.
- Measure the needed angle and direction for your solar panel
The tilt angle of your solar panel should be determined by the latitude of your location anywhere in the globe using a solar tracker. It is often assumed that modules set at a tilt angle equal to the latitude of the location will produce the most energy.
Simple Tips for Installation to Make Things Easy and Mistakes to Avoid
- Choose the right type of mount for you. There are three types of mounts: pole, roof-ground and flush mounts. Each will help you install in a specific location.
- Take care of any sunlight obstacles before starting solar PV installation. Remove any unneeded obstacles, such as branches that may be blocking sunlight to your solar unit.
- To avoid fatigue, use the right equipment and remember to take pauses. Always use eye protection, gloves, and closed-toe boots.
- Always keep a multimeter on hand. Before proceeding, double-check the wires and terminators for zero volts.
- Before you begin, spend some time reading the manufacturer’s solar PV installation guide. Make a to-do list using the instructions. This will help you to organise your equipment, hardware, and tools as you progress through each task.
- The proper installation of solar panels is critical. Solar panels are set out and secured to a mounting framework such that they do not tilt or wobble. Civil work should be used to ground the solar panel mounting framework.
- Solar panels should always be placed at a 30-degree angle to maximise efficiency. In addition, solar panels should be installed towards the southwest.
- Earthing safeguards your solar system by preventing overload, directing surplus power to the ground, stabilising voltage, and preventing accidents.
How to Install the Solar Panels
Step 1 – Assemble all the tools you will need. It includes tape measures, ladder, chalk line, hammer, ink marker, wire stripper, screwdriver, multimeter and any other tool that the guide suggests.
Step 2 – First, measure out the mounts using a tape measure and mark them on the desired spot. Make sure there is enough space around it all, just in case. Make sure you double-check with the installation guide about the weight and check the sturdiness of your space.
Step 3 – Now install the solar panels and fix them in place. The panels will require precautions. So, be patient and take help from someone if needed. Ensure that you check for electrical wiring and their exits. It will make things easier for you in the next step.
Step 4 – The next stage is to complete the electrical wiring. During wiring, universal connectors such as MC4 are utilised since they can be linked to any type of solar panel. In a series connection, the positive wire from one module must be connected to the negative wire of another module. A parallel connection connects the positive to the positive and the negative to the negative leads. A parallel connection keeps the voltage of each panel constant, but a series connection raises the voltage to match the voltage of the battery bank.
Step 5 – Now connect the wiring to the inverter as instructed in the solar PV installation guide. Connect the positive solar panel wire to the positive inverter terminal and the negative solar panel wire to the negative inverter terminal. Other connections include the battery wire connection and the output wire connection to the inverter. To generate energy, a solar panel, a solar battery, and a grid input are all linked to a solar inverter. The inverter’s input is connected to the output of a series of solar panels. While making the connections, ensure the inverter is switched off.
Step 6 – A battery is required in an off-grid solar system since it is utilised to store backup power. This battery is linked to a solar inverter, which recharges it using a solar panel and the grid. The battery’s positive terminal is linked to the inverter’s positive terminal and negative to the negative terminal.
Step 7 – To connect the inverter to the grid, simply plug it into the main power switchboard and it will get electricity from the grid. The output cable is also linked to the board that supplies power to the house. A metering device must be installed to determine the surplus energy generated by the solar system. The positive wire from the metering device must be connected to the line terminal, and the negative wire must be connected to the inverter’s neutral terminal.
Step 8 – Turn on the mains when all the connections are completed. There is a digital display that indicates the total solar unit generated during the day, the supply voltage and current (amp) from the solar panel, and other information.
Thermax Global – Where Quality and Technology Goes Hand in Hand!
It is important to choose a solar PV installation company in India that is known for efficiency and great practices. This ensures that you get the best solar panels for your investment.
Thermax Global has years of experience and knowledge in the construction of solar power plants. Thermax has assisted some of the industry’s largest companies in making the transition to solar energy with ease. It has been a pioneer in developing creative solutions to challenging issues.
Among other things, they are the leaders in industrial solar PV installations and innovators of more efficient technologies. Choosing Thermax Global is not just the right but the obvious choice!
So, visit Thermax Global now or contact us via email (customer.support@thermaxglobal.com) or call us on toll free number 1800-209-0115 for your solar PV installation now!


